This is just the beginning of it. More things will be added. I showed The Boy pictures from this website. We already had a pallet up and ready in our backyard, it's the side wall of our compost pile.
It's just outside our back door, too, so the Dread Pirate Grasshopper and Nod can stand out here and pour water into the containers to their heart's content and still be right under our noses and presumably out of trouble (you never can be sure with these two).
Last time we had a singing, a lot of people brought carbonated beverages in two litre bottles, and we saved them. He used a drill- he tried a hammer and nails, but found that awkeward- he didn't have enough room to swing.
I think a shallow container- like a window box, on the ground at the bottom would be cool, too- then they can float little boats in it.
Speaking of boats- here is how to fold paper boats.
1. Make them from glossy magazine or catalog pages and they do float for a while. You take any rectangle shaped piece of paper and fold it in half (bringing the two shorter edges together):
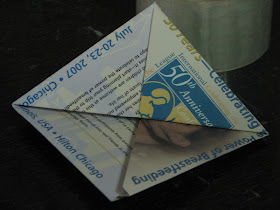
2. Lay it so that the folded edge is uppermost. Mark the center of the fold and fold the right corner down into a triangle, so that the folded edge is now lying vertically against the center of the page. Bring the left top corner down to meet- the two folded edges of the triangles are now touching each other.
I propped it up above so you could see the folds better, but you want to leave this lying flat and crease the folded edges of the triangle very well.
3. Now fold up the bottom edge of the paper over the two triangles:
4. Flip it over and do the same to the other side:
Now you have a hat, if you wanted a paper hat.
5. For the boat, Fold this into a square by gently opening it a bit and bringing the two corners I've marked 'A' down to meet each other. Your old creases are now diagonal creases, and you want to crease the edges of your square really well:
6. now fold it again, this time, taking the corner I've marked 'A' and folding it up, bringing the 'A' up to meet the top corner, folding the square on one side in half.
7. Flip your square over and repeat with the other side, so now you have a triangle again:
8. Repeat steps 5- making a square again.
9. Now fold the open corner of the square up to the closed corner- on my example, I will be folding the corner with the 'P' in power up so that it is touching the corner with the 'g' at the end of breastfeeding. Repeat with the other side. It should look something like this:
10. Now you are ready for your boat- this is the trickiest part. You are going to gently take hold of the two triangles in the center, and pull them apart- a little up and out (in opposite directions)
As you pull these corners up and out, the other sides also pull up to make the boat, so you end up with something like this:
 |
| side view of the paper boat |
 |
| top view of the paperboat |
Yes, I did just make a paper boat that says "Celebrating the Power of Breastfeeding' right across the side of the boat.
No, that wasn't on purpose. But I do think it's cool.


The water wall - what a wonderful idea!
ReplyDeleteI think the boat fold can also be the basis for a paper hat, though I was never any good at such elementary crafts.
And now I have an earworm: Where Go the Boats by RLS
Your lactivist boat gave me a giggle. What a great project! I need to start collecting things to do this with my boys!
ReplyDeleteCM, I didn't really even notice what the ad was for when I tore the back page off of an issue of Mothering magazine I had. Love how it ended up.
ReplyDeleteFrances, love Where Go the Boats.=)